Integration Components#
Talkable Loyalty is composed of the following components:
-
Script Location. The Initialization script should be placed in the head template or some template that spans every page. All other integration components are dependent on the Init script.
Data Capture. The Initialization Script should pass variables for logged in users:
Email
Phone Number
First Name
Last Name
Custom Properties
Customer ID
-
DIV Location. Talkable Container DIV should be placed in the body of every page where you want to show a loyalty campaign. This DIV tag determines the place where the campaign is shown.
Initialization Script#
The Initialization script should be placed in the head template or some template that spans every page. Talkable JS library size is typically around 20kB and causes no noticeable impact to your site’s loading time. All other integration components are dependent on the Initialization script.
<!-- Begin Talkable integration code -->
<script async src="https://d2jjzw81hqbuqv.cloudfront.net/integration/clients/<YOUR-TALKABLE-SITE-ID>.min.js"></script>
<script>
  window._talkableq = window._talkableq || [];
  window._talkableq.unshift(['init', { site_id: '<YOUR-TALKABLE-SITE-ID>' }]);

  window._talkableq.push(['authenticate_customer', {
    email: '', // required, loyalty program is only available to logged in users. Example: 'customer@example.com'
    phone_number: '' // Optional, pass when available. Example: '+12025551111'
    customer_id: '11111' // Optional, Customer ID inside your system
  }]);
</script>
<!-- End Talkable integration code -->
Initialization Script Notes#
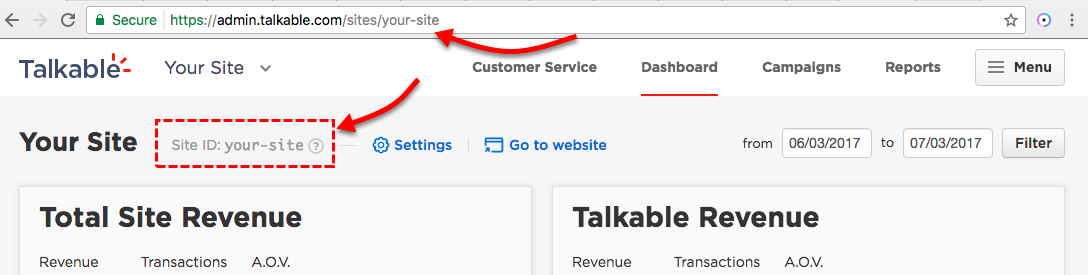
Site ID. You can obtain your Site ID by logging into the Talkable platform where Site ID is displayed on your Dashboard and URL as seen here:
Variables. Use your dynamic variables to pass user details.
Talkable Container DIV#
Add the following Talkable Container DIV in the body of every page where you want a loyalty campaign to be shown:
<div id="talkable-loyalty"></div>
The Talkable Initialization Script must be present in your head template in order for the Loyalty Dashboard to work. The placement of the DIV tag is important since it’s going to determine where the campaign will be rendered.
Note
The same DIV tag is used for both Loyalty Dashboard and Loyalty Redeem Widget. You can find more info about where to place the DIV tag in Loyalty Dashboard Placement and Loyalty Widget Placement.
Loyalty Dashboard Notes#
The dashboard can be added inline inside your user accounts menu, however the dashboard content width for proper display is 980px.
Loyalty Widget Notes#
Add Talkable Container DIV at the checkout exactly where the loyalty points redemption widget should be rendered.
Loyalty Actions#
To register custom loyalty actions (e.g. completing surveys, adding reviews, uploading something on site), use the following code:
<script>
  window._talkableq.push(['register_loyalty_action', {
    rule_identifier: '', // required, can be found in Campaign Rules -> Loyalty action configurations -> "identifier" field
    traffic_source: '' // optional
  }]);
</script>
Loyalty Actions Notes#
register_loyalty_action optionally accepts email and custom_properties. If none provided, values will be taken from respective parameters of authenticate_customer. Email must be provided in either of the sources to register loyalty actions.