Shopify#
Automatic integration#
Note
If you have previously integrated with Talkable, make sure you remove the manual Talkable integration script located in the Additional Content & Scripts section before you start the Automatic integration process. See Manual integration for details.
Contact sales@talkable.com to learn about our pricing and set up an account with Talkable
Provide a valid Shopify store URL. Example: https://123test.myshopify.com
Choose “Shopify” as your platform during registration process
Install the Shopify integration app via the link provided by Talkable team
After the successful installation you will be redirected back to Talkable
Enable “Referral Integration“ toggle
Create, set up, and launch Campaigns (Invite, Advocate Dashboard, etc.)
Verify your integration using Verifying Integration instructions
Note
Post Purchase campaign is located at the “Thank you” page after Checkout.
To check how Standalone Campaign looks visit /pages/share or /pages/invite links of your store. You can edit these links in Administrative panel of your store.
Important
If you are managing the Shopify theme code using a Shopify Github integration, make sure to pull the changes to the theme made by the automatic integration to avoid resetting them with a commit. The theme updates are described in the Manual integration instructions.
Manual integration#
For Shopify Online Store 2.0 themes#
If your Shopify store uses an Online Store 2.0 theme, please follow the instructions below.
Provide a valid Shopify store URL and choose “Shopify” as your platform during registration process
On the Welcome screen click “I’m a Developer”
Pass Shopify authorization
You will be redirected to your Shopify store, log in and click the install button
After successful installation you will be redirected back to Talkable
Click “Integrate manually“
In your Shopify Admin, add the integration to your layout:
Create a snippet:
Go to Online Store → Themes
Click Actions (”…” button) → Edit code
Go to Snippets
Click “Add a new snippet“
Create a new snippet called talkable-partial
In the newly created file, add the following code:
<!-- Begin Talkable integration code -->
<script type="text/javascript">
  window._talkableq = window._talkableq || [];
  {% if customer %}
    window._talkableq.push(['authenticate_customer', {
      email:        '{{ customer.email }}',
      phone_number: '{{ customer.phone }}',
      first_name:   '{{ customer.first_name }}',
      last_name:    '{{ customer.last_name }}'
    }]);
  {% endif %}
</script>
<script async src="//d2jjzw81hqbuqv.cloudfront.net/integration/clients/<YOUR-TALKABLE-SITE-ID>.min.js" type="text/javascript"></script>
<!-- End Talkable integration code -->
Note
Replace <YOUR-TALKABLE-SITE-ID> with your Talkable Site ID which is displayed on the integration page.
Click “Save”
Render the snippet in the layout:
In the theme code editor (Online Store → Themes → Edit code), go to Layout
Open theme.liquid file
Before closing </head> paste the following code:
{% render "talkable-partial" %}
Click “Save”
In your Shopify Admin, create resources for referral share page:
Create a share page section:
In the theme code editor (Online Store → Themes → Edit code), go to Sections
Click “Add a new section“
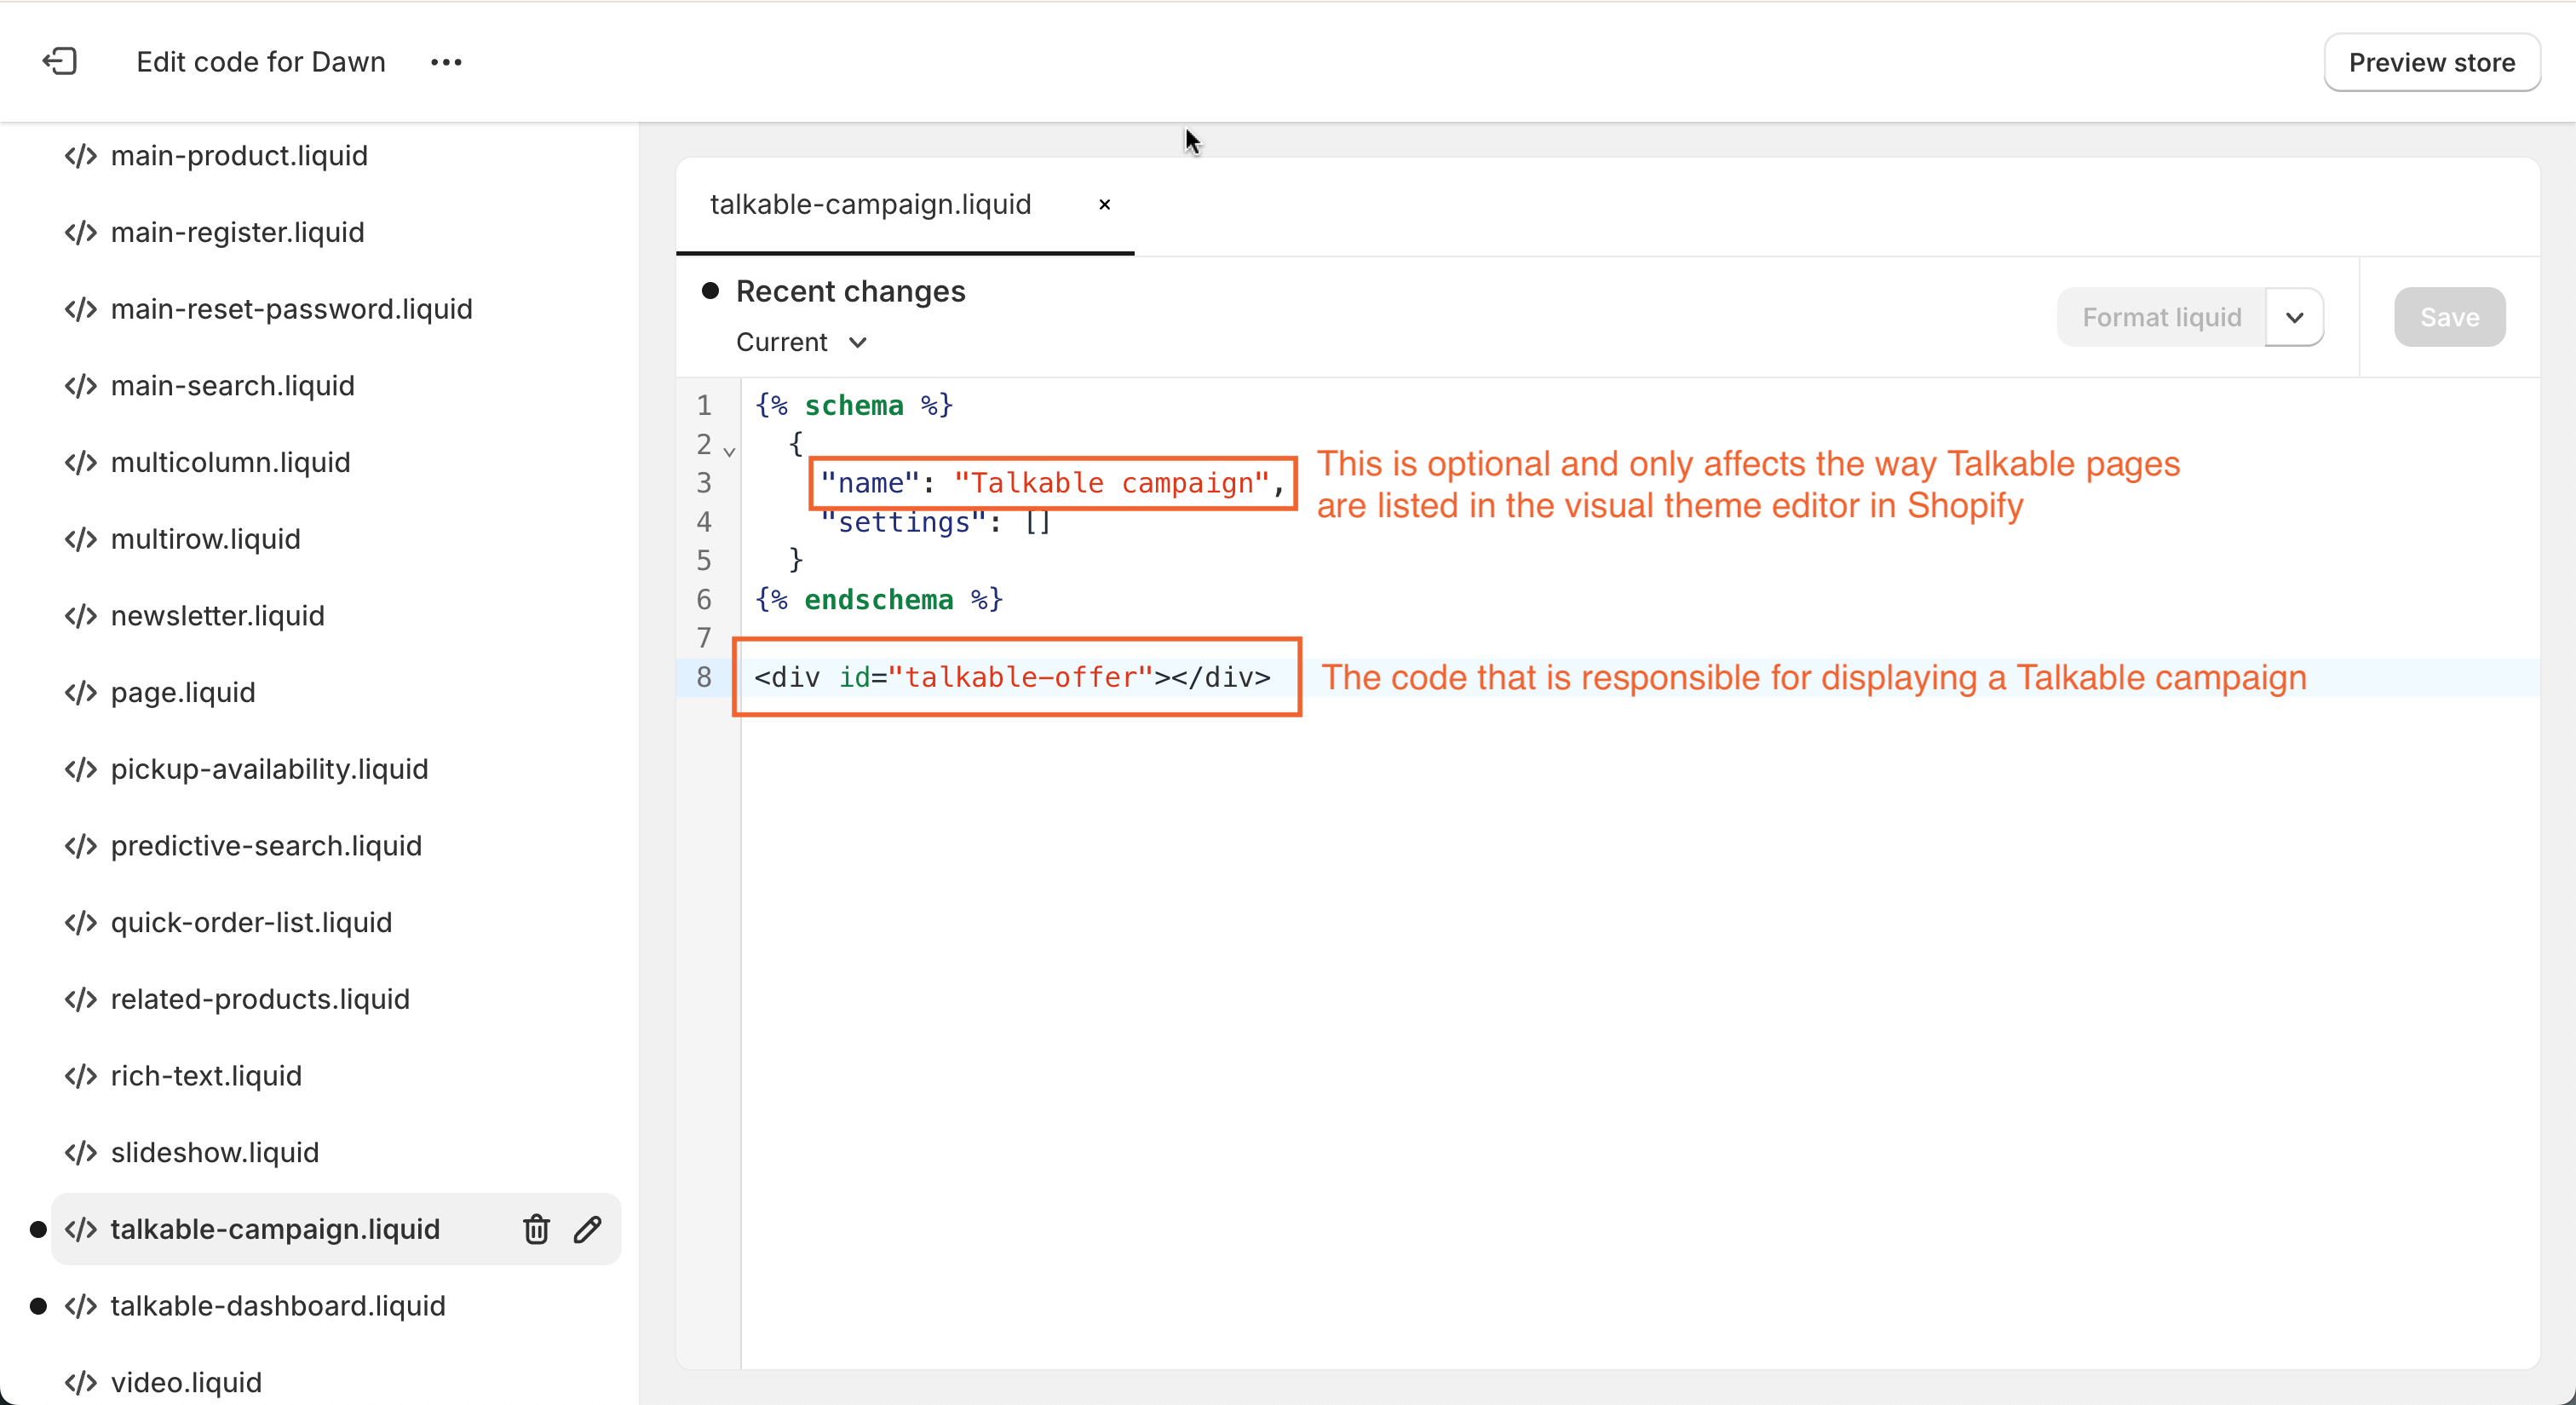
Create a new Liquid section called talkable-campaign.liquid
In the newly created file, add the <div> block for the referral campaign.
<div id="talkable-offer"></div>
Optionally, update the schema name to anything meaningful, for example, “Referral campaign“
Click “Save”
Create a share page template:
Go to Templates
Click “Add a new template“
Create a new JSON template of type page called talkable (page.talkable.json)
Change the type of the main section to talkable-campaign
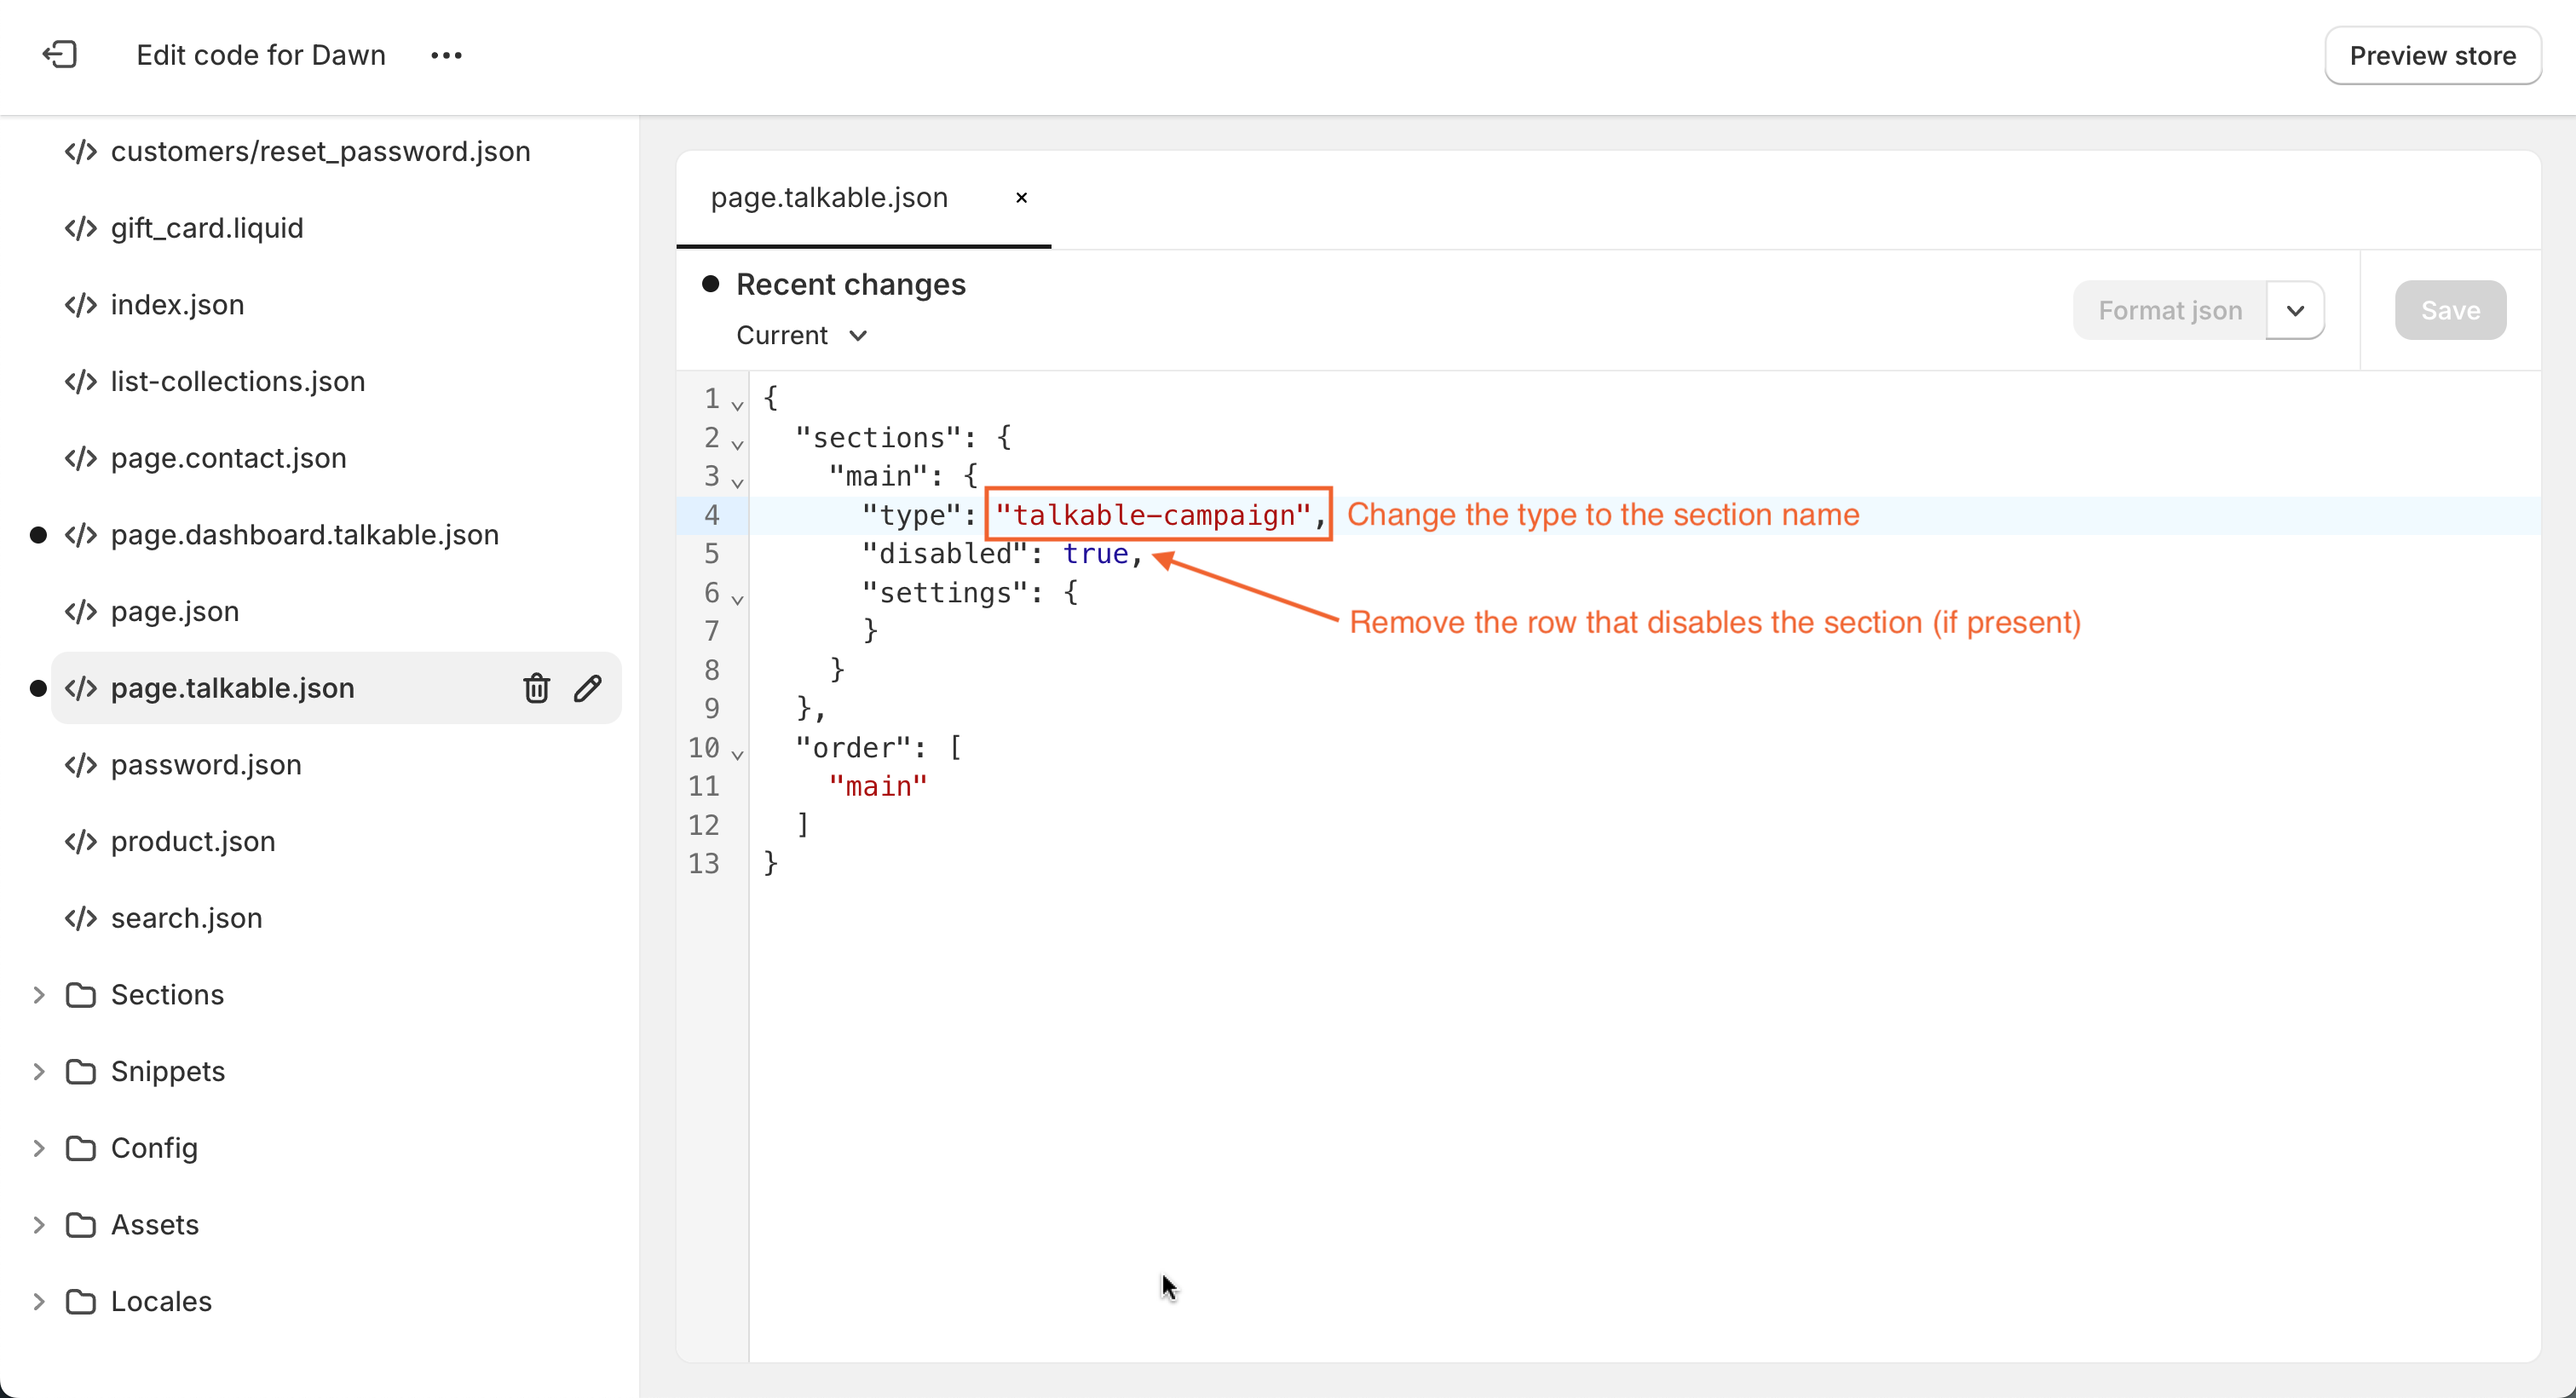
Important
The name of the section should be the same as the one you used in the previous step when naming your section file.
Important
If your main section is disabled, remove the row that does it.
Create a page:
Exit theme editor if it was opened
Go to Online Store → Pages
Click “Add page“
Add title: Share
Select theme template: talkable
Click “Save”
In your Shopify Admin, create resources for referral dashboard page:
Create a dashboard page section:
In the theme code editor (Online Store → Themes → Edit code), go to Sections
Click “Add a new section“
Create a new Liquid section called talkable-dashboard.liquid
In the newly created file, add the following code:
{% if shop.customer_accounts_enabled %}
  {% if customer %}
    <div id="talkable-offer"></div>
  {% else %}
    {{ 'Log in' | customer_login_link }}
  {% endif %}
{% endif %}
Optionally, update the schema name to anything meaningful, for example, “Referral dashboard“
Click “Save”
Create a dashboard page template:
Go to Templates
Click “Add a new template“
Create a new JSON template of type page called dashboard.talkable (page.dashboard.talkable.json)
Change the type of the main section to talkable-dashboard
{
  "sections": {
    "main": {
      "type": "talkable-dashboard"
    }
  }
}
Important
The name of the section should be the same as the one you used in the previous step when naming your section file.
Important
If your main section is disabled, remove the row that does it.
Create a page:
Exit theme editor if it was opened
Go to Online Store → Pages
Click “Add page“
Add title: Referral Dashboard
Select theme template: dashboard.talkable
Click “Save” (Customer accounts must be enabled in Settings → Checkout)
In your Shopify Admin, add a post-purchase script:
Go to Settings → Checkout
Scroll down to Order status page
Paste the following code into Additional scripts field:
<!-- Begin Talkable integration code -->
<script type="text/javascript">
  window._talkableq = [['init', {
    site_id: '<YOUR-TALKABLE-SITE-ID>' // REQUIRED - Replace with your Talkable Site ID
  }]];

  if (Shopify && Shopify.checkout) {
    checkout = Shopify.checkout
    var _talkable_order_items = [];
    for (idx in checkout.line_items) {
      line = checkout.line_items[idx];
      _talkable_order_items.push({
        product_id: line.sku || line.product_id, // REQUIRED - First Item Product ID
        price: line.price, // REQUIRED - First Item Unit Price
        quantity: line.quantity, // REQUIRED - First Item Quantity
        title: line.title, // Optional - Name of product
      });
    }

    var _talkable_data = {
      purchase: {
        order_number: checkout.order_id, // REQUIRED - Order number
        currency_iso_code: checkout.presentment_currency, // Optional - Purchase Currency. REQUIRED for Multi-Currency Sites
        subtotal: checkout.subtotal_price, // REQUIRED - Purchase Subtotal Price
        tax_amount: checkout.total_tax, // REQUIRED - Purchase tax amount
        discount_amount: checkout.discount ? checkout.discount.amount : null, // REQUIRED - Total Discount
        shipping_amount: checkout.shipping_rate ? checkout.shipping_rate.price : null, // REQUIRED - Total Shipping Cost
        coupon_code: checkout.discount ? checkout.discount.code : null,
        items: _talkable_order_items
      },
      customer: {
        email: checkout.email, // REQUIRED - Customer Email Address
        first_name: checkout.billing_address ? checkout.billing_address.first_name : null, // Optional - Customer first name
        last_name: checkout.billing_address ? checkout.billing_address.last_name : null // Optional - Customer last name
      }
    };

    if (checkout.shipping_address) {
      shipping_address = checkout.shipping_address;
      shipping_fields = ['address1', 'address2', 'city', 'province', 'zip', 'country'];
      address = [];

      for (var idx in shipping_fields) {
        address_key = shipping_fields[idx];
        if (shipping_address[address_key]) {
          address.push(shipping_address[address_key]);
        }
      }

      if (shipping_address.zip) {
        _talkable_data.purchase.shipping_zip = shipping_address.zip;
      }
      if (address.length) {
        _talkable_data.purchase.shipping_address = address.join(', ');
      }
    }

    _talkableq.push(['register_purchase', _talkable_data]);
  }
</script>
<script async src="//d2jjzw81hqbuqv.cloudfront.net/integration/clients/<YOUR-TALKABLE-SITE-ID>.min.js" type="text/javascript"></script>
<!-- End Talkable integration code -->
Note
Replace <YOUR-TALKABLE-SITE-ID> with your Talkable Site ID which is displayed on the integration page.
Click “Save”.
Verify your integration using Verifying Integration instructions.
Important
If you are managing the Shopify theme code using a Shopify Github integration, make sure to pull the changes to the theme made by the automatic integration to avoid resetting them with a commit.
For Shopify vintage themes#
If your Shopify store uses a vintage theme, please follow the instructions below.
Provide a valid Shopify store URL and choose “Shopify” as your platform during registration process
On the Welcome screen click “I’m a Developer”
Pass Shopify authorization
You will be redirected to your Shopify store, log in and click the install button
After successful installation you will be redirected back to Talkable
Click “Integrate manually“
In your Shopify Admin, add the integration to your layout:
Create a snippet:
Go to Online Store → Themes
Click Actions (”…” button) → Edit code
Go to Snippets
Click “Add a new snippet“
Create a new snippet called talkable-partial
In the newly created file, add the following code:
<!-- Begin Talkable integration code -->
<script type="text/javascript">
  window._talkableq = window._talkableq || [];
  {% if customer %}
    window._talkableq.push(['authenticate_customer', {
      email:        '{{ customer.email }}',
      phone_number: '{{ customer.phone }}',
      first_name:   '{{ customer.first_name }}',
      last_name:    '{{ customer.last_name }}'
    }]);
  {% endif %}
</script>
<script async src="//d2jjzw81hqbuqv.cloudfront.net/integration/clients/<YOUR-TALKABLE-SITE-ID>.min.js" type="text/javascript"></script>
<!-- End Talkable integration code -->
Note
Replace <YOUR-TALKABLE-SITE-ID> with your Talkable Site ID which is displayed on the integration page.
Click “Save”
Render the snippet in the layout:
In the theme code editor (Online Store → Themes → Edit code), go to Layout
Open theme.liquid file
Before closing </head> paste the following code:
{% render "talkable-partial" %}
Click “Save”
In your Shopify Admin, create resources for referral share page:
Create a share page template:
In the theme code editor (Online Store → Themes → Edit code), go to Templates
Click “Add a new template“
Create a new Liquid template of type page called talkable (page.talkable.liquid)
Paste the following code inside layout of this page instead of {{ page.content }}:
<div id="talkable-offer"></div>
Click “Save”
Create a page:
Exit theme editor if it was opened
Go to Online Store → Pages
Click “Add page“
Add title: Share
Select theme template: talkable
Click “Save”
In your Shopify Admin, create resources for referral dashboard page:
Create a dashboard page template:
In the theme code editor (Online Store → Themes → Edit code), go to Templates
Click “Add a new template“
Create a new Liquid template of type page called dashboard.talkable (page.dashboard.talkable.liquid)
Paste the following code inside layout of this page instead of {{ page.content }}:
{% if shop.customer_accounts_enabled %}
  {% if customer %}
    <div id="talkable-offer"></div>
  {% else %}
    {{ 'Log in' | customer_login_link }}
  {% endif %}
{% endif %}
Click “Save”
Create a page:
Exit theme editor if it was opened
Go to Online Store → Pages
Click “Add page“
Add title: Referral Dashboard
Select theme template: dashboard.talkable
Click “Save” (Customer accounts must be enabled in Settings → Checkout)
In your Shopify Admin, add a post-purchase script:
Go to Settings → Checkout
Scroll down to Order status page
Paste the following code into Additional scripts field:
<!-- Begin Talkable integration code -->
<script type="text/javascript">
  window._talkableq = [['init', {
    site_id: '<YOUR-TALKABLE-SITE-ID>' // REQUIRED - Replace with your Talkable Site ID
  }]];

  if (Shopify && Shopify.checkout) {
    checkout = Shopify.checkout
    var _talkable_order_items = [];
    for (idx in checkout.line_items) {
      line = checkout.line_items[idx];
      _talkable_order_items.push({
        product_id: line.sku || line.product_id, // REQUIRED - First Item Product ID
        price: line.price, // REQUIRED - First Item Unit Price
        quantity: line.quantity, // REQUIRED - First Item Quantity
        title: line.title, // Optional - Name of product
      });
    }

    var _talkable_data = {
      purchase: {
        order_number: checkout.order_id, // REQUIRED - Order number
        currency_iso_code: checkout.presentment_currency, // Optional - Purchase Currency. REQUIRED for Multi-Currency Sites
        subtotal: checkout.subtotal_price, // REQUIRED - Purchase Subtotal Price
        tax_amount: checkout.total_tax, // REQUIRED - Purchase tax amount
        discount_amount: checkout.discount ? checkout.discount.amount : null, // REQUIRED - Total Discount
        shipping_amount: checkout.shipping_rate ? checkout.shipping_rate.price : null, // REQUIRED - Total Shipping Cost
        coupon_code: checkout.discount ? checkout.discount.code : null,
        items: _talkable_order_items
      },
      customer: {
        email: checkout.email, // REQUIRED - Customer Email Address
        first_name: checkout.billing_address ? checkout.billing_address.first_name : null, // Optional - Customer first name
        last_name: checkout.billing_address ? checkout.billing_address.last_name : null // Optional - Customer last name
      }
    };

    if (checkout.shipping_address) {
      shipping_address = checkout.shipping_address;
      shipping_fields = ['address1', 'address2', 'city', 'province', 'zip', 'country'];
      address = [];

      for (var idx in shipping_fields) {
        address_key = shipping_fields[idx];
        if (shipping_address[address_key]) {
          address.push(shipping_address[address_key]);
        }
      }

      if (shipping_address.zip) {
        _talkable_data.purchase.shipping_zip = shipping_address.zip;
      }
      if (address.length) {
        _talkable_data.purchase.shipping_address = address.join(', ');
      }
    }

    _talkableq.push(['register_purchase', _talkable_data]);
  }
</script>
<script async src="//d2jjzw81hqbuqv.cloudfront.net/integration/clients/<YOUR-TALKABLE-SITE-ID>.min.js" type="text/javascript"></script>
<!-- End Talkable integration code -->
Note
Replace <YOUR-TALKABLE-SITE-ID> with your Talkable Site ID which is displayed on the integration page.
Click “Save”.
Verify your integration using Verifying Integration instructions.
<span class="a">https://123test.myshopify.com</span>
Important
If you are managing the Shopify theme code using a Shopify Github integration, make sure to pull the changes to the theme made by the automatic integration to avoid resetting them with a commit.
Manual migrating from a vintage theme to an Online store 2.0 theme#
If you have previously integrated Talkable in your vintage Shopify theme and want to migrate to a newer theme, you need to do the following:
Share page migration:
If you have a templates/page.talkable.liquid file, store its content elsewhere and delete the file
Create a share page section:
In the theme code editor (Online Store → Themes → Edit code), go to Sections
Click “Add a new section“
Create a new Liquid section called talkable-campaign.liquid
In the newly created file, add the <div> block for the referral campaign.
<div id="talkable-offer"></div>
If there were any customizations in the templates/page.talkable.liquid, add them as well
Optionally, update the schema name to anything meaningful, for example, “Referral campaign“
Click “Save”
Create a share page template:
Go to Templates
Click “Add a new template“
Create a new JSON template of type page called talkable (page.talkable.json)
Change the type of the main section to talkable-campaign
Important
The name of the section should be the same as the one you used in the previous step when naming your section file.
Important
If your main section is disabled, remove the row that does it.
Dashboard page migration:
If you have a templates/page.talkable-dashboard.liquid file, store its content elsewhere and delete the file
Create a dashboard page section:
In the theme code editor (Online Store → Themes → Edit code), go to Sections
Click “Add a new section“
Create a new Liquid section called talkable-dashboard.liquid
In the newly created file, add the <div> block for the referral campaign.
{% if shop.customer_accounts_enabled %}
  {% if customer %}
    <div id="talkable-offer"></div>
  {% else %}
    {{ 'Log in' | customer_login_link }}
  {% endif %}
{% endif %}
If there were any customizations in the templates/page.talkable-dashboard.liquid, add them as well
Optionally, update the schema name to anything meaningful, for example, “Referral dashboard“
Click “Save”
Create a dashboard page template:
Go to Templates
Click “Add a new template“
Create a new JSON template of type page called dashboard.talkable (page.dashboard.talkable.json)
Change the type of the main section to talkable-dashboard
{
  "sections": {
    "main": {
      "type": "talkable-dashboard"
    }
  }
}
Important
The name of the section should be the same as the one you used in the previous step when naming your section file.
Important
If your main section is disabled, remove the row that does it.
Important
If you are managing the Shopify theme code using a Shopify Github integration, make sure to pull the changes to the theme made by the automatic integration to avoid resetting them with a commit.
Note
Also Talkable provides integration for Shopify Plus.
Contact us
Interested in setting this up? Contact your CSM or get in touch here.